Sunday, 28 December 2008

Homeward Bound

Hi All

I've had word that Paul, Jess And Ellie (my son, girlfriend and her daughter) have caught their flight from Dubai, and are winging their way nearer to me as we speak (or more accurately, as I type). My dear husband is on his way to Heathrow airport and in a few hours they will be home. I'm so looking forward to seeing them.
Anyway now I can show you the surprise that's ready for them when they return.
As they posted some of their holiday photo's on Facebook, I thought I would download them and I make them a little gift to remind them of that sunnier climate. I was planning a few more as I thought they were going to stay longer if they could get their flights transferred, but alas they did not.

I chose this photo with the palm tree, blue skies and even blue'er water, as I thought it would make them pause and think about the fun time they had whenever they look at it. I used simple blue Bazzil for the background, and as I loved those crate papers I used in my last project, I thought I would use them again. I matted the photo on that gorgeous hot terracotta which makes it standout from the blue, and brings warmth to the design.


The flowers were stamped on to the patterned Crate Paper with a stamp that was free with the Craft Stamper magazine a while back. I added gold liquid pearls to the stamens, and a gold gem to the centre.

The edges of the petals were curled up to give dimension, and some of the flowers were layered up together for more impact, some were left with just one layer. They were then grouped around the photograph.

I made some more hearts using Glossy Accents as in my last project, but this time I sprinkled a little crystal glitter onto them and left to set. The glitter just catches the light and reminds me of a glint of sunlight, you can't see it too well on the photo though.

The sentiment is from a stamp by Hero Arts. I cut up the words to add a bit more interest, and matted them on a semi-circle of the Crate Paper, to which I then added more Liquid Pearls around the edge.

I've mounted the whole thing in a 6x6" box frame. I'm really pleased with how it's turned out. I hope they love it as much as I do.

Thanks for taking the time to visit.

Take care.

Photobucket

Friday, 26 December 2008

Off To Dubai...

Hi All
Hope your all enjoying your festive holidays, now that the mad rush is all over. I know I am. It's so stressful this time of year...all that present buying, I can never think what to buy the male side of the family...Girls are sooo easy to buy for.
This year I had a few extra's....my two son's girlfriend's, and also the adorable daughter of one of the girlfriend's...but they were easy compared to the boys.
You might have read that one of my son's has gone to Dubai for Christmas with his girlfriend Jess, as her Mum lives out there. Well he has now posted some photo's on Facebook...and let me tell you...I wish I was there too. I have a small surprise planned for them when they arrive back in England, but I can't tell you what it is right now.
Now then...The title of this posting...'Off To Dubai' may suggest that I'm soon going on a trip....but this is not really the case...I only wish I was.
Before my my son & co went to visit this far off land, Jess asked me to make a little present for her Mum, which I was glad to do. So I'm travelling in spirit, through my work which is travelling farther than I've ever been myself before.
So here's what I'm showing you today, as it is now a few thousand miles away...
I have made these accordian photo cards before, and love them for that personal touch. The Crate Paper's I used are beautiful. I love the colours, and I found the flowers from Prima to match too. I'm really pleased with how this turned out, and hope Jess's Mum liked it.

I decorated both sides, to make the most of the space. The photo's Jess gave to me were old one's which I had to copy. After changing them to black and white in Photoshop, and cropping them a little, I printed them out. I would normally print them on to photo quality paper, but they did not print well onto this, so I opted for good quality heavy weight copy paper, which the image looked better on strangely enough.

I used a lacing technique, where I tore a 'v' shaped section out of the top patterned layer of paper. The edges of the paper were then inked with a versacolour ink pad and holes were punched in each side of the tear, through which I laced embroidery thread. I then embossed a piece of plain paper with a Cuttlebug embossing folder, and slipped it behind the missing section to give a two layer effect.

The flowers were layered up, with a button for the centre, and placed randomly over the sections of each side.

The heart embelishments were made using stamps from Magnolia. They were coloured by sponging Versacolour ink all over. This one was stamped with an additional flower stamp for interest. Next I covered with Glossy Accents, and a gem was placed in the centre of the stamped flower image and left to set. I love the result....Who say's you always have to use bought embelishments....with a bit of imagination and patience, you can make your own...and best of all they match your colour scheme beautifully.

Thanks you taking the time to look...I'd appreciate your comments if you care to leave any.

Happy Holiday Crafting.

Photobucket


Thursday, 25 December 2008

Merry Christmas

Hi

Just wanted to wish everyone a very merry Christmas...Enjoy your day....I'm missing my son who's in Dubai, but he called me earlier, and it was good to hear his voice... Love to you all.

Photobucket

Friday, 19 December 2008

Christmas Tree Kitty

Hiya

Aww......how cute is this, kittens in a Christmas tree......my christmas tree. Luckily it's 7 feet tall, and quite robust. But it does sway a little when all four of them are playing games in there. I took this photo yesterday. Three of the kittens will be leaving me after Christmas, but we are keeping one, can't resist them.

My son (Paul), his girlfriend (Jess) & her daughter (Ellie) are off to Dubai tomorrow for Christmas...lucky devils. I wish I was going, I could just do with a warm climate at this point in time. I hope they will have a fantastic time. They are visiting Jess' mother who lives out there, so I know they'll be in good company. I will miss him though, it's the first time he won't be here for Christmas dinner since he was born 24 years ago.

Photobucket

Sugar Nellie Christmas

Hi All

I'm gradually doing a few cards now I've started to feel a little better after suffering from Flu. I'm still not 100%, but am a lot better than I was. It's really taken it's toll this time.

Anyway I sent this card to my blogging pal Lynsey. And now that she has received it I'm showing it to you all. I just adore this image from Sugar Nellie, its such fun to colour.


I coloured the image with my Copic's. The snowflakes were cut with Cuttlebug and Sizzix dies. and the papers are by Imaginescence. I just love this card, and have done several more on the same theme, but different colours and papers. Hope you like it.


Photobucket

Monday, 15 December 2008

More Blog Candy For Me

Hi all

Wow How lucky am I. I won Julie's fantastic blog candy that you can see below.

Now Julie has this cute little cat called Pippa, who had a bit of a mishap with a tray full of glitter. You had to guess what happened, and I made up a little ditty which goes:


Glitter, glitter everywhere

Up nose and in my hair

Glittered pawprints on the floor

Walking out towards the door

The other cats all laughed at me

They were jealous now you see

As on the CATWALK now I stood

Fur a sparkling really good
Just like a celebrity

A designer frock just for me.....

The thought of a cat full of glitter just made me laugh so much, I just had to share my thoughts on it....from Pippa's perspective of course.


Anyway thanks Julie I'll look forward to the postman coming.


Photobucket

Sunday, 7 December 2008

Penny Black Christmas Sparkle.

Hi all

I'm still recoverng from the flu. I have a nasty cough now, and am still lacking energy. But I do have a card to show today. And I am quite proud of this one even though I say it myself.


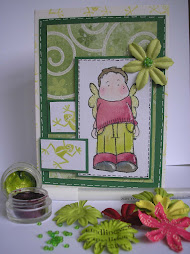
This is one of my special family cards for this year. I love it because it makes a real statement. It's more than just a card. It's full of sparkle, glamour and dimension. The image is from Penny Black, which I actually bought last Christmas. See I don't just buy new stamps, I do use my old ones occasionally too. It was coloured using Zig Art pens, and the dress, hat and boots were glitted with crystal glitter. I added some applique paint to the 'furry' bits on the hats, dress and boots and puffed it up with my heat gun.


The snowflakes were cut with Cuttlebug dies. The large snowflake was dabbed with blue brilliance ink in the middle and the points for variation, and to tie in with the blue colour scheme. I then covered it with Glossy Accents, and sprinkled crystal glitter on to it and left to dry. Doing it this way means that you get a rather sturdy snowflake instead of a flimsy one, as the Glossy Accents set hard. I added a bright blue gem to the centre, bling bling.


In this picture you can see how the card is folded. In half and then the top half folded back on itself. The matted image was stuck half over the fold. The scrolled silver and white paper was stuck onto what is really the inside of the card.


The Christmas tree was made using a template. I used a ready bought one, but you could make your own, it's an easy shape to draw. I used two shades of Bazzil and cut out three tree shapes from each shade. I scored each one in half, then stamped and embossed showflakes onto each tree shape. I added some silver sequins to some of the snowflakes.

To assemble the tree, just adhere back to back on one half only. The unstuck side will stick to one half of the next tree and so on. Just keep adding the trees until the are all joined together. Stick one side of the tree to the card, and open up. It may sound complicated, but once you get going you will see it all coming together for youself. It's actually very easy. Thought I should have done step by step photo's to help you.
If you leave the side of the last tree free, you will be able to close it up, and fit into a shallow box, and the receipent can open the tree up themselves. Imagine their delight, and surprise. You could really go to town on these little trees, making them as table decorations, or for the mantlepiece. They are so cute. Let me know if you decide to make one, and I'll pop on over to your blog and take a look.
I'd be happy to hear your comment's if you have the time to leave any. Thank you for visiting.
Happy Crafting.
Photobucket


.

Friday, 5 December 2008

The winner is....

Thank you to all those who joined in my blog candy challenge. Not a huge response, but that made the odds favourable. Anyway I'm sorry you all had to wait, I've been laid up in bed with flu all week, and this is only a quick post as I'm still lightheaded from not eating.
Anyway on to the draw....
Da da daaaa....
Random Integer Generator
Here are your random numbers:11
Timestamp: 2008-12-05 13:44:44 UTC
This means that
is my winner for this one.
Well done Viv...I hope you enjoy using the stamp and bits and bobs I'm sending you.
Thanks to everyone else that played along, I enjoyed seeing what you created with my sketch. I'm just sorry you couldn't all be winners.

Photobucket

I Won...iwoniwoniwon

Hi All
Wow...I was sooo surprised and delighted when this morning I logged onto my emails and Ila told me that I won some of her Blog Candy. HURRAH. To say I'm thrilled is an understatement. I've been laid up in bed all week with flu, and this is the first time I've felt well enough to look at the blogging world again. Imagine my delight to find out I won. It's perked me up no end. So thank you Ila, I shall look forward to receiving your generous candy.
Photobucket

Monday, 1 December 2008

Techno Candy

Hi All

Keeping up with technology these days is a hard game. However the manufacturers of those 'good old fashioned' Love Hearts are very much in keeping with today's youth. I picked up a packet of them the other day, just because I like them, and they evoke memories of my own childhood.
I don't really read the little quotes on them, so I don't know what made me look down this time. But when I did, I was amazed to find, not love you...or be mine...but TEXT ME and EMAIL ME..
They certainly are keeping up with the times.
Thanks for reading...I'd be curious to hear your comments, or whether you have come across anything similar.
Photobucket

House Mouse Challenge #15

Hi All
I just received my first ever House Mouse stamp...I waited ages as it was out of stock at the time of ordering, but I'm so glad I never gave up on it. I adore it. It's actually not a mouse but one of the Gruffles bear stamps. Perfect for a baby card.

Anyway the challenge over at House Mouse & Friends, (which I'm just getting posted in time), was polka dots. I chose polka dot paper, with a brown & pastel theme, and matched it up with baby blue.

I stamped bear paw prints around on one side of a 6" square card. The image was coloured with Copic markers, (I'm hooked on these). I used my nestabilities to cut it out. Then matted it on a larger circle of blue Bazzill. I added some blue and white gingham paper, which I sponged around the edge with blue Brilliance ink, and drew on faux zig zag stitching with a Sakura pen. I like the effect. Some Prima flowers and a few tiny buttons finished it off.

I decorated the inside of this card. I think it looks lovely, and what a surprise when you open it to have the inside looking as good as the outside. Of course it does take more time and materials, but for special cards it's well worth it. I'm very happy with how this card turned out.

Happy crafting.

Photobucket

Card Slideshow

Digital Scrapping

Guestbook

Leona Lewis - Il Divo

Playlist


Powered By Blogger